Dry shade is two constraints at once. The aim is a useful, modest planting that can establish in the available root space, not a lush damp-woodland effect maintained by continual rescue watering.
Find the cause of the dryness
Observe whether a wall sheds rain away, overhead foliage intercepts it, competing roots dominate the ground or the soil itself holds little moisture. Record the pattern after rain and during a dry period. Do not dig exploratory trenches beside established trees or services.
Use this trial where there is suitable plantable, draining soil and occasional moisture. If severe root competition dominates, preserve the root area and move planting to a workable edge. If soil stays moist, use the damp-shade scheme instead; foamflower is not a like-for-like dry-site replacement.
Read the measured planting plan
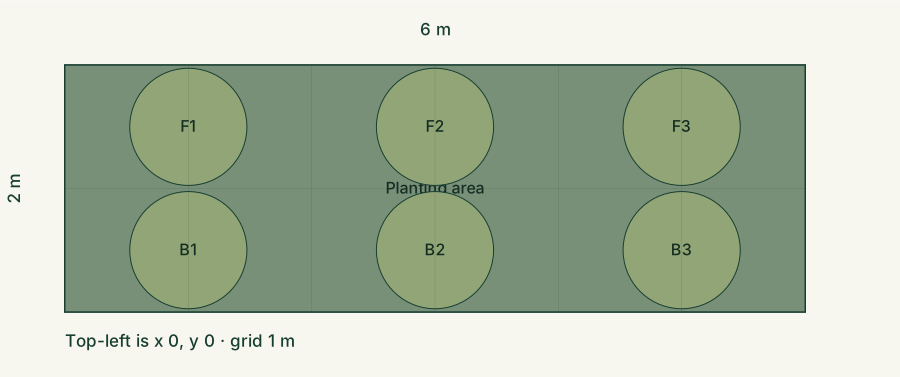
The outline is 6 × 2 m: 12 m². Planting beds occupy 12 m². The top is the visual rear, not a compass bearing. Paths outside the outline are additional space. Test reach and maintenance access before copying it; widen access or divide deep beds where needed.
Circles reserve adult spread, not the size of a new nursery pot. Gaps are deliberate. Soil and neighbouring growth can change the eventual size, so check the named plants and keep the ability to edit the scheme. The diagram is an original concept, not an installed garden.
Open this layout in the planner, choose “Use this example,” then edit positions and dimensions. Its current plant inventory follows additions and deletions. Export the editable plan as well as the drawing.
Keep the planting deliberately sparse at first
Three Christmas ferns provide fine fronds and three bergenias provide broad leaves. Their profiles support some dry-condition tolerance, but both need establishment attention. The large gaps make it possible to inspect the trial and avoid guessing that every shaded square metre should immediately be planted.
Bergenia brings a spring flowering interval; the main year-round intention is leaf contrast, with evergreen performance dependent on climate and exposure. The larger reserved diameter accounts for the conflicting spread figures in the linked bergenia source.
Shopping list and exact positions
| Plant | Count | Diameter each |
|---|---|---|
| Polystichum acrostichoides | 3 | 0.95 m |
| Bergenia crassifolia | 3 | 0.95 m |
Total: 6 individual planting positions. Open each profile for source-backed size, light, moisture, climate and safety checks. A botanical match alone does not establish local native status or suitability.
Show centre coordinates for setting out
Measure x from the left and y from the top. All coordinates are metres. Plant labels match the diagram.
| Label | Centre x | Centre y |
|---|---|---|
| F1 | 1 | 0.5 |
| F2 | 3 | 0.5 |
| F3 | 5 | 0.5 |
| B1 | 1 | 1.5 |
| B2 | 3 | 1.5 |
| B3 | 5 | 1.5 |
Set out empty pots or temporary markers first. Check views, access and the mature circles before planting. For a compatible material applied at an illustrative 5 cm depth, the full bed area would be 600 litres before subtracting obstructions and crown clearances. This is geometry, not a prescribed mulch type or depth for every plant. Calculate your actual material and depth.
Use the first season to test the premise
Mark each position and record the actual soil and light. Plant only where root and utility checks permit. Observe new root-zone moisture regularly, especially where rain may not reach the ground. Do not add a thick new soil layer over existing tree roots to create a planting bed.
If one group repeatedly wilts while another remains sound, investigate their positions separately. Persistent leaf damage, poor establishment or an impractical watering demand is evidence to reduce or relocate the planting. Dry-tolerant is not the same as tolerant of every dry site.
Choose the long-term workload
Once established, remove damaged foliage as needed and check that adjacent growth has not changed the light or water balance. Retain useful soil cover where compatible with the site, keeping plant crowns and access clear. Do not expand until the trial has passed the difficult season.
A smaller successful group beside a seat may be the better outcome than a continuous struggling groundcover. Compare that approach with the woodland design guide, where protecting existing trees takes priority over filling every gap.
Keep the assumptions visible
Sources & checks
The layout and calculations are original illustrative examples. Horticultural and access guidance is informed by the sources below, checked on 3 October 2026. Local conditions still determine suitability.
- RHS: planning a border from conditions and mature plant size
- NC State: Polystichum acrostichoides — dimensions and conditions
- NC State: Bergenia crassifolia — dimensions and conditions
- RHS: dry and damp shade combinations
Prepared with AI assistance. No on-site assessment or professional approval is implied. Read our editorial approach.