The problem with a narrow garden is rarely its length alone. It is that every decision seems to pull in the same direction: fences, a strip of lawn, parallel borders and a shed at the end. Give the length a sequence of useful places, while keeping the route between them straightforward.
Choose a sequence, not a trick
A garden does not have to disguise its shape to work. Start by naming the things you genuinely want to do: eat near the kitchen, sit away from the house, grow food, store bikes or reach a rear gate. Put those uses in the order that makes daily movement easiest.
Draw the doors and gates before drawing beds. A diagonal path is only useful if it arrives somewhere sensible. A screen is only useful if it gives privacy without cutting off the route, blocking needed light or creating a difficult pocket to maintain.
Three arrangements with different commitments
Two destinations, one side route
Keep dining near the house and a smaller seat farther away. Run a continuous route down one side, with planting on the other. Choose this when moving bins, tools or bicycles matters. The trade-off is a visibly linear route; soften it with changing planting heights rather than making access awkward.
A chain of planted rooms
Place a crosswise bed or partial screen between two open areas. Leave a generous opening aligned with the main route. This can reduce the sense of looking straight down a corridor, but it creates more edges, corners and maintenance decisions. Reject it if the plot is too narrow to keep both the planting and the opening useful.
A productive strip
Use one side for reachable food or cutting beds and keep the other side open. It is a good choice when gardening itself is the main activity. It will look seasonal and sometimes bare; if you want a year-round sitting garden, keep a separate structural border or choose the first arrangement.
Work through a 4 × 12 m plot
This original concept begins with a 4 × 3 m terrace next to the house. Beyond it, a 1.2 m-wide route follows the left edge for 9 m. A 1.4 × 6 m border occupies the right-hand middle, and a 2.8 × 3 m destination zone fills the far-right end. A 1.4 × 6 m open strip between route and border can remain flexible while you learn how the garden is used.
The areas reconcile: terrace 12 m², route 10.8 m², border 8.4 m², far destination 8.4 m² and flexible middle 8.4 m² total 48 m². These are space allocations, not paving or accessibility specifications. Set out the route and turning points with the actual equipment and people using them.
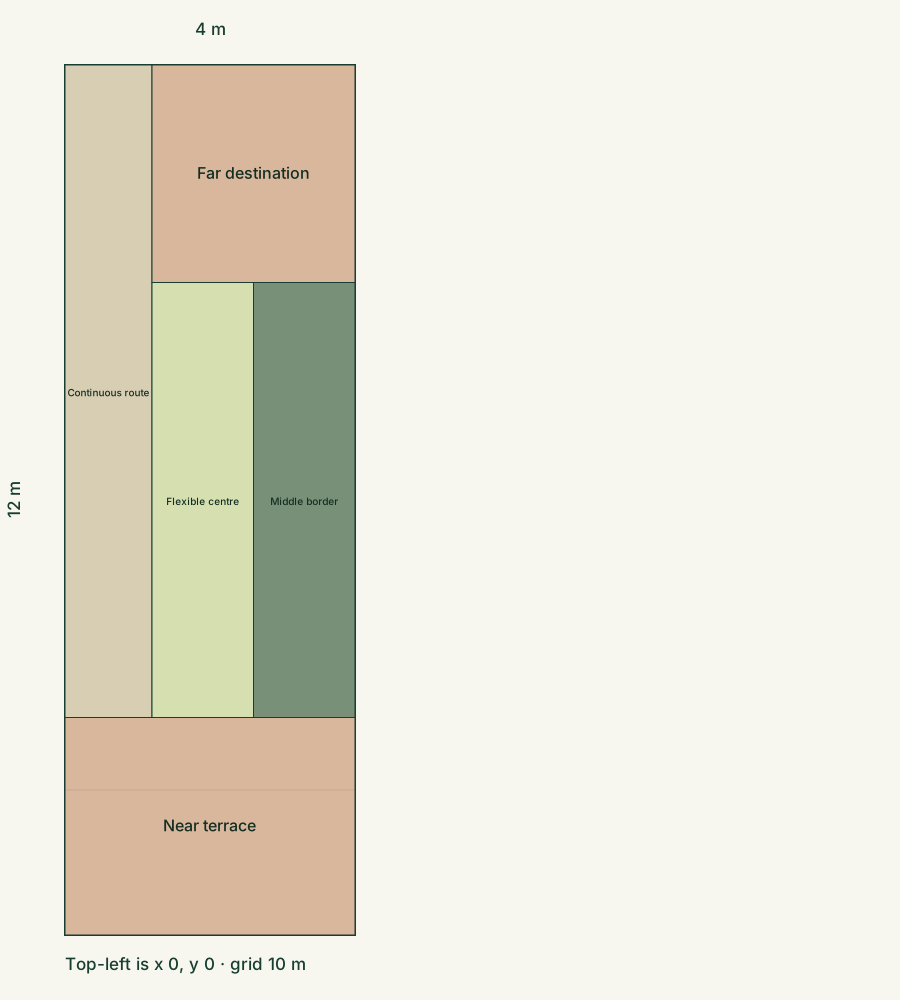
If the back gate sits on the right instead of the left, mirror the route in the editable plan. Avoid crossing the route with a narrow bed merely to preserve symmetry. Utilities and existing trees may require a completely different arrangement.
Make the planting change along the length
Record where direct sun falls in the near, middle and far portions. One planting list may not fit all three. The RHS border guide treats light, soil and mature dimensions as selection inputs; keep those observations beside your sketch.
Use a repeated low layer to connect the view, then vary one seasonal feature at each destination. Repetition does not require one species everywhere: a sunny, dry section and a shaded, moist section can share a similar leaf scale or colour while using different plants.
Reserve the mature width of any hedge or shrub. In a narrow space, a metre lost to overgrown planting can remove most of the usable route. If privacy depends on annual clipping, put that time in the care budget and retain access to both the working side and the base.
Build in stages and keep a way through
First repair essential access and confirm drainage and buried services. Second mark the terrace and destination with movable furniture. Third plant one coherent section. This lets you change an unsuccessful seating position before it becomes expensive.
For the 8.4 m² border, a purely illustrative 5 cm surface layer would be 420 litres. Deduct permanent obstructions and choose an appropriate material and depth before ordering. Use the quantity calculator to record any extra allowance separately.
During establishment, walk the full route with watering equipment. Later, watch for plants leaning into the narrowest point, corners that collect wet leaves and a destination that is never used. Improve the arrangement that actually exists, rather than preserving an attractive first drawing.
Keep the assumptions visible
Sources & checks
The layout and calculations are original illustrative examples. Horticultural and access guidance is informed by the sources below, checked on 3 October 2026. Local conditions still determine suitability.
- RHS: planning a border — light, soil and mature plant size
- Thrive: accessible garden design — routes, reach and rest
Prepared with AI assistance. No on-site assessment or professional approval is implied. Read our editorial approach.